Showing posts with label DIY. Show all posts

Thursday, 26 February 2015

DIY wall art: smart and effective!

DIY "paper wreath", aka Juju hat knock-off.


Wow, that's neat! That was my exact reaction when I saw my client's DIY wall art. So smart, decorative and inexpensive!
 
An old book, a cardboard circle and hot glue were all the materials she used to create this fancy wall decoration. Here's a tutorial on how you can create your own: https://www.youtube.com/watch?v=XNLmdnbud48

Circular shapes in general are great for breaking up the many sharp angles and corners that so often exist in a room. Think: walls, windows, doors and shelves - most of the time they are rectangular or square.

Introduce some round shapes and the space will immediately look more interesting and friendly. 

As with so many things in design, it's all about the mix!


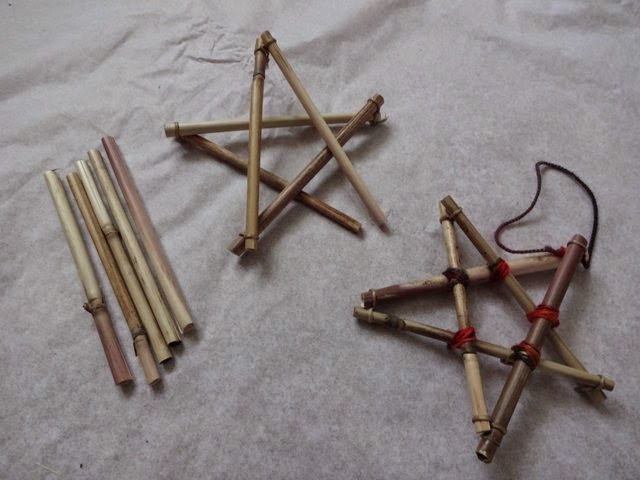
Close-up of my client's DIY "paper wreath". Doesn't it look
a bit like... 
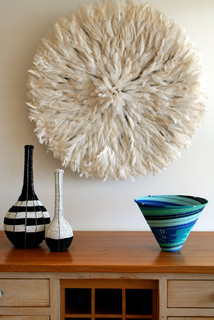
...a fluffy Juju Hat? This African, feather headdress, also called Bamileke,
is a quite popular decoration above fireplace mantels, and is often seen 
in contemporary spaces, and in very vibrant colours. See below.
Photo: Houzz.

         
Photos: Pinterest.

 
Here's the inspiration photo for this post, as seen in the March issue of Canadian
House & Home and Western Living Magazine. I love the textured,circular wall art.
Not to speak of the tiles on the fireplace surround!

Thursday, 22 January 2015

Colour beats the winter blues

If you, like me, spend most of your visit at the Royal Ontario
Museum at their aquarium, awestruck by the vibrancy inside,
you know for sure that you're suffering from colour deprivation!
Some call it cabin fever, I call it colour deprivation!

As winter is holding us in a firm grip, let's lift our spirits by springing into colour, and let's do it pronto, no better time than now.

While we're at it, let's also have some fun! That means going beyond the typical addition of accent pillow, colourful throw or bouquet of tulips. I'm talking real projects here with a colourful impact. After all, when we're over it, we can always paint over it.

Here we go:
Paint trim, baseboards and mouldings a cheery yellow!
Photo: Remodelista.
If youre walls have wainscoting, try a vibrant green that goes
so well with this black-and-white scheme. Photo: Benjamin
Moore.
I am craving colour in my windows now! In this
photo the purple/mauve curtains provide nice
contrast to the yellow-green chairs and pillows.
This is such a fun idea, which can be done fairly quickly,
with a lovely, humorous result. Photo: Better Homes and
Here's a variation of the same idea.
Photo: Petitepassport. 
 
Let me know if you have other colourful ideas to beat the winter blues. I'm off to get more inspiring ideas at the Interior Design Show in Toronto. Watch out for my trend report!

Monday, 22 December 2014

'Tis the season...


Oh Christmas tree, how lovely are thy branches...

A client asked me a few weeks ago what decorations to use for her tree. "Anything that makes you happy and that mean something to you", I replied, knowing the result might look nothing close to a "designer tree", but instead would be very unique and personal.

I like that approach.

I think a Christmas tree is great for letting your personality shine through and for telling your story, whether it's about travels, hobbies, traditions or culture.

Following my own background, this Christmas I'm all over simple straw decorations, that are such a big part of the Swedish Christmas tradition.

"The real thing", bought in Sweden a few years ago.


I've made a few pieces using local materials to complement the store-bought ornaments that were already in my tree.

For a beginner straw crafter, I'm pretty happy with the result, which makes for cute little hostess gifts these holidays. Check them out below.

Wishing you Happy and Safe Holidays!
See you in 2015!


Hand-made straw star à la Nina.
Here's another shape I tried, with added
plumes in the corners.


Materials. I got the straw from the roadside along HW 17,
just west of North Bay. The waxed thread is from Lee Valley Tools
and the wool yarn from Stix and Stones in North Bay.

 
Speaking of Christmas trees, isn't this metal one just the coolest?
Made by Kathleen Atkinson-Hindle. Available at Art on Main.


Monday, 20 October 2014

Bright ideas for a cloudy day

With an airy and geometric frame, this fixture
looks more like a sculpture than a light source.
Photo: West Elm.
The weather might be dull, but inside it's sure luminous! Lighting is enjoying a revival today as one of the key ways to set a room's style and boost its personality. 

For contemporary lighting, the trend continues to be "less is more".

Geometric shapes are in focus, making many fixtures look more like sculptures than light sources.

The pared-back industrial style is also still making strides, featuring fixtures with little more than a bulb and a wire. Simple and efficient.

Too simple, you might say?

But easy is good, especially if you're into DIY. And DIY is great if you're on a budget but still want high style. 
 
Ready to challenge your creativity? Below are links to three awesome lighting projects to try on a cloudy day. As always when it comes to electrical work, leave the final installation to a certified electrician. Here we go:
 

1) These fashion-forward fixtures are made of drinking straws, pipe cleaners, spray paint, cord and light socket. You get the idea just by looking at the pictures of the site.


2) To complete the Lindsay Adelman's Hanging Pendant above, you buy a complete kit here ($57) and follow the instructions. Lindsay Adelman's DIY projects also include a chandelier, mobile, desk lamp and sconce. Photo: Remodelista. Here are the parts for the Hanging Pendant kit:


3) Finally, here's a link to making an industrial pipe floor lamp (below).
http://howaboutorange.blogspot.ca/2014/04/how-to-make-industrial-pipe-floor-lamp.html. Make sure to read all the comments regarding enhancing the safety of this lamp.


Sunday, 24 August 2014

Turning inspiration into reality

Breakfast nook with "new", old curtains.
We all do it. Copy and "steal", that is. Whether it's a great look, clever design solutions or a twist on something tried and true, inspiration is everywhere, and summer is an especially good time to refill our idea banks.

Here are three ideas that I've brought into my home this summer. None of them major or revolutionary, quite the contrary. But they all strike a chord with the style I like for my home. Rather than copying the ideas "right off", I've tried to add a personal twist to make them more "mine".

Let's have a look.
Here's the inspiration shot in an interior designed by


1) In a previous post this summer, I talked about skipping window treatments all together, to let more light and greenery in. While I love the idea, I also like the simple and fresh look of white curtains. I wanted to try a concept using black ribbons to break up all the white. Seeing it in House & Home's special edition "Decorating with white" this summer finally convinced me to take out the sewing machine. I attached three narrow ribbons onto the existing curtains, which instantly added a graphic, contemporary punch to my breakfast nook.


Wall display from CB2 in Toronto.
2) As soon as I spotted this display in the CB2 store in Toronto,  I knew it would be perfect for my patio. "It can't be hard to make", I thought, and a couple of weeks later, with a few wooden boards and some help, I created my own slatted structure.

What I especially like about it is that the display can be changed indefinitely simply by adding, removing or changing the location of the pots.

My pots are from Target and have holes on the back and perch from nails in the slats. The pots from CB2 have a wire hanging arrangement, which allows for even more versatility. The galvanized steel also looks better than the plastic ones I used, I think, so I'll keep my eyes open for something similar.


Here's my version of the display. There is still 
room for more plants!

Shelf from CB2.
3) During the same visit to CB2, I also saw this wall shelf that I was drawn to for the same reasons as the plant display: it's flexibility. I also like how the irregular pattern of the steel ledges and rods almost make it look like a piece of art in itself. Did I make my own, you wonder? No, in this case I just bought it. Fast and easy!   

What has inspired you this summer?


Here's my take on it.

Saturday, 1 February 2014

Glam in a can - 10 IKEA revivals

The glamorous side of IKEA at IDS 2014.
It was all glitter and glam at IKEA's booth at the Interior Design Show last week (trend report coming soon!).

And while opulence is normally not a trademark of the budget-friendly big box store, you can fairly easily convert IKEA's pieces into high-style, shimmering showstoppers.

Check out these ten amazing transformations:


1) Vittsjö shelving unit and gold paint:

Photo source: Sköna Hem.

 2) Angenäm bowl and lamp cord and socket kit:

Photo source: Sköna Hem.

3) Vittjö nesting tables and gold paint:


4) Malm chest, stencil and gold paint:


Photo source: veracamilla.nl

5) Lerberg trestle, gold or copper paint:


 6) Koppang chest, gold or brass nails and hardware:


 7) Patrik swivel chair, brass paint:
Photo source: thanir.com

8) Ekby Järpen/Bjärnum wall shelf, gold paint:

Photo source: designmanifest.com

9) Rast chest, black paint, brass hardware:

Photo source: Källa: yourmoderncouple.com

10) Lack side table, brass nails, leather details and glass top:

Photo source: thezhush.blogspot.se

Wednesday, 8 August 2012

Practical, personalized placemats


Make your own decorative and kid-friendly placemats! All you need is some end-of-the-roll wallpaper and access to a laminator; stationary and printing stores normally offer laminating services.

And while you're at it, why not make the laminated placemats two sided? Each side could be distinctly different from the other, so that you can alternate according to the season. For example, use a patterned wallpaper in happy greens for the summer, and a wallpaper in deep burgundy for the winter. Or make one side graphic with black-and-white, while the other side is soft and floral.

Where to get the wallpaper? Check end-of-the-roll supplies at decorating stores, or see what you find at our local thrift stores. Big-box chains and many paint stores also sell wallpaper by the roll. 17" x 14" is a good size for the final placemat. Why not give it a try?

Wednesday, 28 September 2011

Elegant DIY tray

This is a stylish tray that I came across on my recent explorations in Toronto. It's made from an old window and a pair of fancy handles. Unlike many other DIY projects, this should be a fast and easy one to put together. Your favourite thrift store will be a good source for the window. Look for one where the glass is in a good condition, and make sure that the window frame and the glass are strong enough to stand up to the task. Don't worry if there are a few scratches on the frame. A little patina just adds to the charm. The next thing is to find the right handles. Visit one of our local hardware stores, or try Lee Valley Tools. An adorned glass and brass handle gives the simple frame some needed bling and contrast. Just attach the handles to the frame and... voilà!