Showing posts with label focal points. Show all posts

Thursday, 26 February 2015

DIY wall art: smart and effective!

DIY "paper wreath", aka Juju hat knock-off.


Wow, that's neat! That was my exact reaction when I saw my client's DIY wall art. So smart, decorative and inexpensive!
 
An old book, a cardboard circle and hot glue were all the materials she used to create this fancy wall decoration. Here's a tutorial on how you can create your own: https://www.youtube.com/watch?v=XNLmdnbud48

Circular shapes in general are great for breaking up the many sharp angles and corners that so often exist in a room. Think: walls, windows, doors and shelves - most of the time they are rectangular or square.

Introduce some round shapes and the space will immediately look more interesting and friendly. 

As with so many things in design, it's all about the mix!


Close-up of my client's DIY "paper wreath". Doesn't it look
a bit like... 
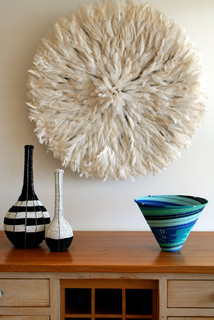
...a fluffy Juju Hat? This African, feather headdress, also called Bamileke,
is a quite popular decoration above fireplace mantels, and is often seen 
in contemporary spaces, and in very vibrant colours. See below.
Photo: Houzz.

         
Photos: Pinterest.

 
Here's the inspiration photo for this post, as seen in the March issue of Canadian
House & Home and Western Living Magazine. I love the textured,circular wall art.
Not to speak of the tiles on the fireplace surround!

Sunday, 11 May 2014

New start for Bracebridge bungalow

The living room used to be very plain without anything special going
for it. We created a nine foot wide focal point which we clad in a
gorgeous travertine stone, and which now houses the fireplace and
the TV. By removing walls, we connected the living room with the kitchen.
 
 
The Bracebridge home that I’ve worked on for the last few months is almost done, and the result looks great! 

From having been a very ordinary bungalow from the late 1990s, it's now an inviting, comfortable and modern home for a small family.

Walls were removed, broadloom was torn up, and wooden floors were installed throughout the house.

This is the view from the front entrance before:

Before: A maze of walls.


And this is what it looks like now:
With two walls gone, the light-filled kitchen and dining area
are now integrated with the living room.


The kitchen before:


Here's a rendition of the new kitchen. We kept the sink, fridge and stove in the same locations, and left the centre free of upper cabinets. That way, we created a nine foot wide wall surface, where a beautiful marble backsplash has the undivided attention. The orientation of the island makes it possible to enjoy both the view outside and to take part in the activities in the rest of the room.


This is what the tile looks like installed.
The backsplash is a 1" hexagon
oriental white honed tile, which
relates nicely with the colours
and style of the tile of the living
room fireplace, on the opposite
side of the room.


Here are a few more shots from the home:


The former dining room was turned into a boy's computer
and TV room.


Details from one of the
bedrooms.


View of the en-suite bathroom, seen from the
master bedroom.


En-suite bathroom before.
We mixed several sizes of the same
tile on the floors and the walls, and
installed a different tile, with a striped
effect, on the shower end wall, to add
depth and interest.
Just like in the kitchen, the tile work is the shining
star. And yes, those mirrors have yet to be installed.


I hope you enjoyed the tour and the transformation of this home. It's now working for the homeowners, in every sense of the word. Happy Mother's Day!

Sunday, 13 November 2011

Focus on dining rooms

What is the focus of this room? Ask yourself that question in every room. The focus will most often relate to the main activity that will take place in that space. So in a bedroom, the focal point will be the bed; in a library, it will be the bookshelves and so on. Make these areas the shining stars of your décor! In the dining room, it's the dining table that should be highlighted and embellished. Here are five tips to get it right:

            Highlight the dining area by placing
            tall objects below the light fixture.
            Photo: Crate & Barrel.
1) Place the dining table right in the centre of the room.
2) Make sure your dining room has a stunning light fixture. Bigger is better than smaller!
3) Place decorative objects that reach up from the table to the light fixture. It can be a bouquet of flowers, some candlesticks or a beautiful bowl. This way you create an axis from floor to ceiling that the eye will be drawn to.
4) Add interest to the side walls surrounding the dining table. A sideboard with a framed mirror and a pair of wall sconces might be a choice for one of the walls, while the opposite wall is adorned with a group of paintings. Now you have further enhanced the floor-to-ceiling axis. There is no question about what the main feature of the room is.
5) Dress your table in a table cloth that complements the colours and textures of the space, take out your best china and cutlery and let the entertaining begin!

Friday, 29 April 2011

A little “wow” goes a long way

In this display, the mirror and the 
downlights enhance the main piece 
of the room, the couch, which acts
as the focal point.
.

Every room needs a highlight that the eye is drawn to, a focal point. Some rooms have one naturally. It can be an impressive fireplace, a beautiful view, or an architectural detail. 
Other rooms lack a natural focus and need help. They need something that attracts attention. It doesn’t have to be complex or expensive, just something that creates interest.
Adding a spectacular plant, a gallery of photos or an oversized mirror over the main piece of furniture, are examples of relatively simple ways to "up" the “wow" factor. More ambitious plans include covering the walls in wainscotting or wallpaper (check out previous postings), improving the illumination through downlights, or painting one wall a different colour. 
If you are lucky enough to have a room with a natural focus-of-attention, make sure that it sets the tone for the rest of the room. Accentuate it! Choose colours, furniture and accessories that mix well, and don’t compete, with this special feature. Arrange your furniture in such a way that it enhances the attraction. 
In a future blog, I’ll talk about how you can create focal points in different rooms. In the meantime, I'd love to hear your "focal-point stories". How are you enhancing the beauty of your rooms?